iPhone Camera Settings to Record Great Videos

iPhone comes with professional camera lenses to capture high-quality photos and videos. However, you need expertise and skills to handle the camera for pro-level video shooting. You need in-depth knowledge and understanding of camera settings while capturing videos for various social media platforms or personal use.
The iPhone has multiple options, including 4K settings, frame settings, HDR videos, Grid settings, Multiple frame settings, and basic stabilization features. A better understanding of these features enables you to utilize the maximum power of the camera to record your videos.
Top Camera Settings of iPhone for Videos
Start creating Verdict in seconds, and convert more of your visitors into leads.
So, here in the below section, I will elaborate on a few camera settings to adopt for better recording of the videos.
Switch to 4k Video Resolution
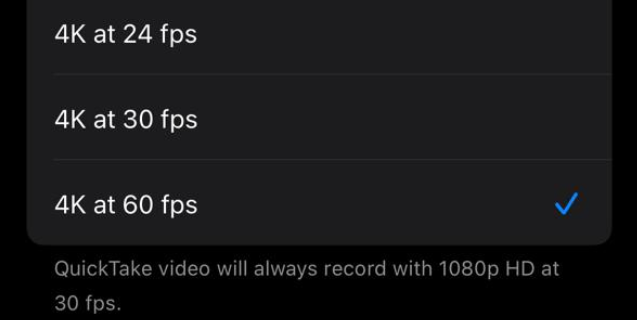
New iPhone models are equipped with 4K resolution technology. This technology enables you to record videos in 4K resolution, which means it is capable of recording four times more detailed videos than 1080p. When you record videos with an iPhone, the first step is to switch the iPhone 14 camera settings to 4K resolution.
Switching to 4K video settings significantly enhances videos’ quality, clarity, sharpness, and detail. It transforms the footage into pro-level video shooting and makes your content different. Whether you are recording outdoors or indoors, 4K settings will allow you to capture videos with stunning details.

Shoot with 24 Frames Per Second
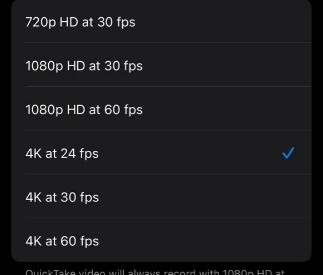
Frame rates matter a lot when shooting professional videos with the iPhone. Increasing the frame rates of the iPhone camera is necessary to improve the cinematic and captivating video quality. 24k is attributed to professional cinematography. 24k is close to the human eye’s standard for discerning motion in real-time. Switching to 4k enables you to create a natural and smoother video experience. It makes your videos pleasing, aesthetic, and authentic, enhancing the viewing experience.

Suitable Options
- 720p at 30fps.
- 1080p at 30 fps or 60 fps.
- 4k at 24 fps, 30 fps, or 60 fps.
Disable HDR Video
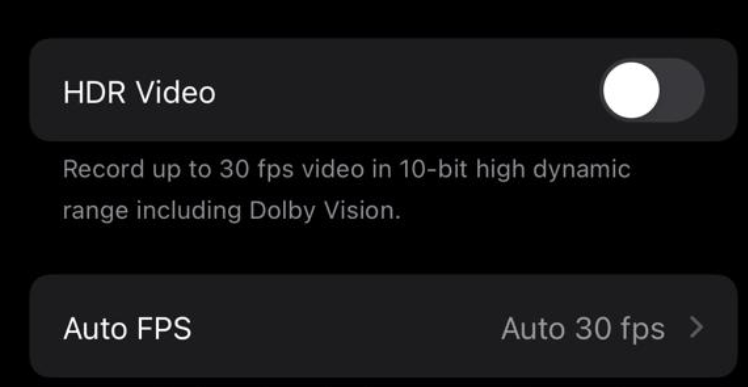
HDR video enhances image quality with brighter highlights, pulsating colors, and a wide range of highlighted details. However, this feature provides results in specific scenarios where scenes are captured in contrast to light and dark areas. It is necessary to understand the requirement of HDR in this scenario.
Sometimes, using HDR causes overlays and saturation of the colors, making the video unnatural. Turning off the HDR video feature while recording videos on the iPhone is recommended. Deactivating the HDR feature ensures consistency of colors with an aesthetic feel.

Enable the Grid Option
The next step is to activate the Grid Option to record pro-level videos on the iPhone. The grid function is the iPhone camera’s lesser-known yet most important feature. It displays a grid overlay on the screen while recording videos. This grid works on the ideography principle called the rule of thirds.
This rule divides the frame into nine equal portions through horizontal and vertical lines. It enables you to create balanced and engaging videos. This feature is activated to develop in-depth and balanced videos.
Disable ‘’View Outside Frame’’
This feature enables you to remove distractions while capturing the perfect shots. The view outside frame feature is helpful in specific scenarios. On the other hand, this feature can hinder the recording of quality videos. Enabling this feature allows you to see what is outside your video’s frame on screen.
While recording, planning your next move can be helpful, but it may distract you from the main object of the video. When you shoot the video on your iPhone, turn off the “View Outside Frame” feature to avoid potential distractions on your screen. This will enable you to keep focus on the main object.
Enable Stabilization Feature
Video stabilization is the thumb rule for professional cinematography. It enhances the viewing experience and makes videos smoother. Before recording video on your iPhone, enable the Stabilization feature. This feature removes camera shakes and creates softer and more stable videos.
Stabilization helps you keep the camera steady, removing bumps and shakes. Whether you are capturing moments while jogging on the track or recording while riding your bike, activating the stabilization feature allows you to create smooth and steady video clips.
Turn on ‘’Macro Control’’
Macro Control enables you to capture close-ups of objects. Activating the Macro Control gives you an easy-to-control toggle that allows you to focus on objects with extreme close-ups. This mode is available on certain iPhone models.
If you get closer to the object while recording, the iPhone camera automatically switches to ‘’Macro mode,’’ but it creates a little bump in the video. This feature also requires sufficient light to provide the desired results.
Basic Video Shooting and Exposure Techniques
Start creating Verdict in seconds, and convert more of your visitors into leads.
There are basic techniques for shooting professional videos. These techniques include balanced lighting, composition, and better exposure.
Balanced Lighting
Balanced lighting is essential for capturing pro-level videos. Before shooting, it is important to review the lighting conditions in the surroundings. If lights are low, use artificial lights and try to manage the extra light while capturing in the morning.
Composition
Composition is essential. When recording videos, keep the rule of thirds in mind. The rule of thirds divides the screen into a three-by-three grid. It enables you to place the subject in the center, making the composition appealing and centered.
Better Exposure
Adjusting the exposure to the brightness requirement is crucial to keeping the videos natural. To do this, tap on the screen or go to settings to adjust the exposure and get the desired result.
White Balance
Another essential technique is white balancing while recording videos. It enables you to match the video colors with the lighting conditions in your surroundings. Auto white balancing is the ultimate solution in most recording situations, enhancing the graphical quality of the videos.
Closing Lines
Start creating Verdict in seconds, and convert more of your visitors into leads.
iPhone camera settings enable you to capture high-quality videos. This article emphasizes the iPhone camera for shooting pro-level video content. These features include frame settings, 4 K settings, HDR videos, Grid settings, and basic stabilization features.
Better understanding and usage of these features produce high-quality videos. Furthermore, balanced lighting, better composition, exposure, and white-balancing techniques are vital in enhancing video quality.
FAQs:
Start creating Verdict in seconds, and convert more of your visitors into leads.
Q1: How do you get the best video quality on iPhone?
To record high-quality videos, switch to 4K Resolution.
Q2: Does the iPhone offer a stabilization feature?
Yes, the iPhone has stabilization features that can be turned on while recording videos.
Q3: What is the Grid Option in the iPhone Camera?
This feature displays a grid overlay on the screen while recording videos. Grid overlay works on the ideography principle called the rule of thirds.
Q4: What is the ideal frame rate while recording videos on the iPhone?
The ideal frame rate is 24 frames per second to record high-quality videos on the iPhone.
Q5: What is the white balance feature?
The white balance feature enables you to match the video colours with the lighting conditions in your surroundings.


