How to Use Unallocated Drive Space in Windows?
In these days, one major problem that people face regarding the gadgets (personal computer, tablets, I pads, or cell phones). Usually when someone faces the storage issue on small gadgets like cell, he takes help from the PC (by transforming data from cell phone to PC). But what to do if PC storage is full? How to handle your data if you are not using cloud storage? Don’t worry! Here we have a solution for you. Your PC windows always have some unallocated drive space in windows and you can add it to partition or system drive that for use.
Read also:
Ways To Protect Your Computer from Viruses and Adware
5 Reasons Your Windows Laptop is Running Slow (How to Fix)
10 Best Free Window 10 Apps You Need On Your Computer
Here, we are going to talk about allocation and use unallocated drive space but here a question pops up in mind.
What is unallocated drive space?
As the name suggests, unallocated space is the part of space in drive that is not alloted to any to any partition. A computer defines any physical space on a hard drive that is not associated with any partition (defined as space on hard drive that has assigned a drive letter e.g. C drive, D drive, E drive, etc ) as “unallocated”. Not a single program in your computer is able to use this space for data storage until you make it a part of actual drive/disk partitions.
Where to explore unallocated space?
In Windows Explorer, you will not see the unallocated space, only you will discover that your hard drive is showing less space that actual. For instance, 1 TB shows 750 GB. It means that 250 GB on your drive is unallocated. Luckily, you can view the complete disk space allocation state, together with unallocated space in Disk Management on different versions of Windows (such as 7/8/10/11) in computer.
How to handle unallocated space?
To use unallocated space, one needs to know what options he can use regarding the alloation of unallocated space in partition. Basically, there are two options:
Creating a new partition in drive (if you want to save some specific files/data separately in a new location, you can make a new partition for unallocated space.
Choose an existing partition to extend ( if your existing partition, for instance, C ,E or any other Drive faces low storage issue, you can extend it by entering unallocated space into it.
Types of partition you can create
The volume or partition that you are creating to allocate the unallocated space must be recognized by windows. There are 3 types of partitions that you can create in this aspect:
- To shrink an already existing partition to create a new logical partition, for instance a new drive named F (or something else), then you can use the SIMPLE volume.
- If there are two or more than two unallocated volumes, then you can combine them (even on discrete physical hard drive) by creating a new partition. This new partition combining various unallocated volumes can be referred to as SPANNED volume.
- If you want to overall improve the storage capacity of all partitions to some extent, you can spread information between multiple disks for this purpose. The overall proficiency will be improved because the chunks of allocated disk are distributed in various partitions. This type of partition function can be term as STRIPED volume.
Method:Create a new partition for unallocated space in drive
Follow the steps mentioned here:
It can be opened by various methods. Here I’m mentioning the easiest one for your convenience.
- Right click on This PC
- Select manage
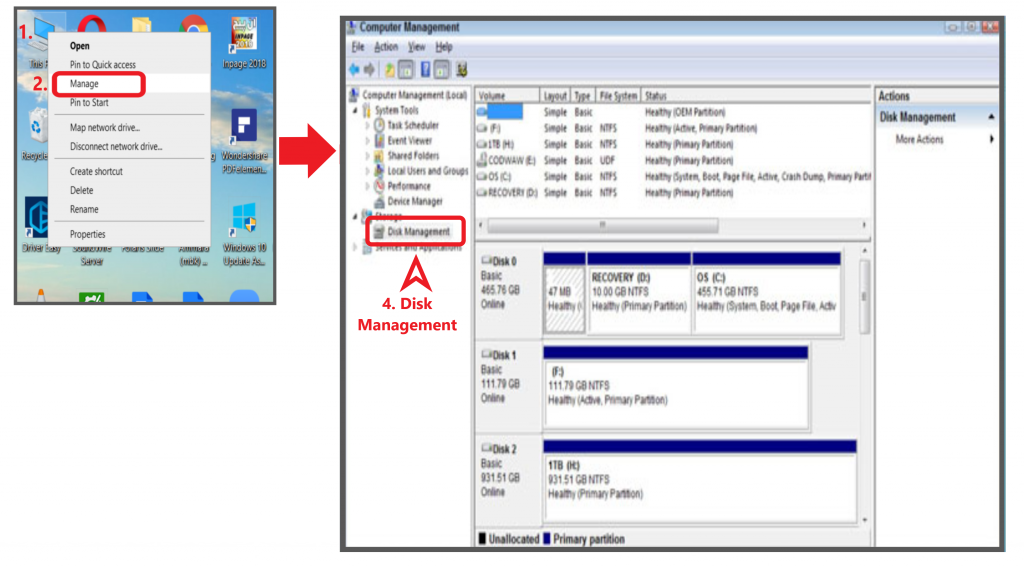
- Click storage
- Choose disk management under storage
- Right click on unallocated space
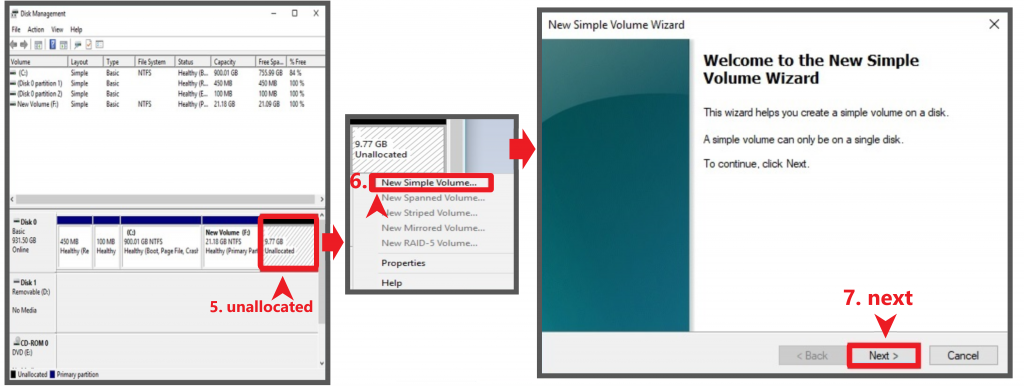
- Select new simple volume. The Welcome to the New Simple Volume Wizard opens
- Click on next
- Now set the size of new volume in MB text box by using Simple Volume Size. Although the recommended size is given according to that storage proportion in other partitions. You can change is as per your choice. For instance, if you edit and set it to smaller size, then remaining space will still remain unallocated.
- Now click on Next.
- Now windows will ask you to assign a letter to the drive. Another option is that you can organize the newly formed drive/partition on NTFS (New Technology File System I.e used by the Windows for the storage, organizing, and searching files on the hard disk) volume in the form of a folder.
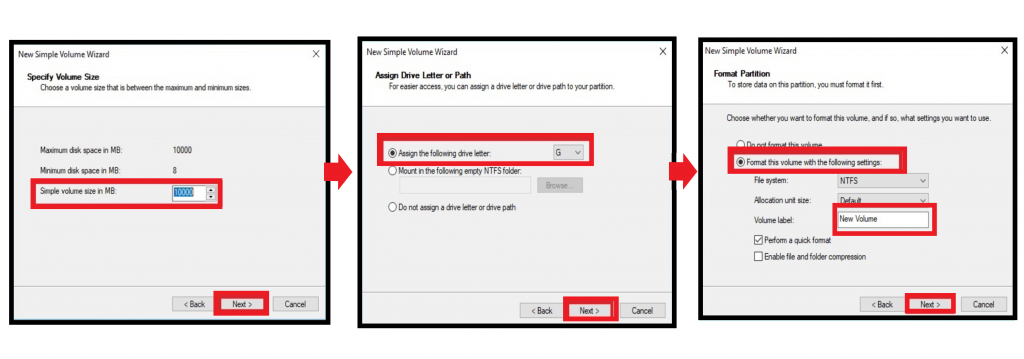
- Click the next button
- Now choose a letter of your choice new volume
- Again click on next.
- Point to ponder is that Windows prepare the disk by formatting it and laying down the parking spaces for the files. Larger is the size of volume, more time will be taken by it for completion of operation. Hence, larger disk drive needs more time to format.
- In the wizard display, you can see the drive being formatted; you can also see its progress at the top centre in status column. The new assigned letter to drive will appear after completion of formatting.
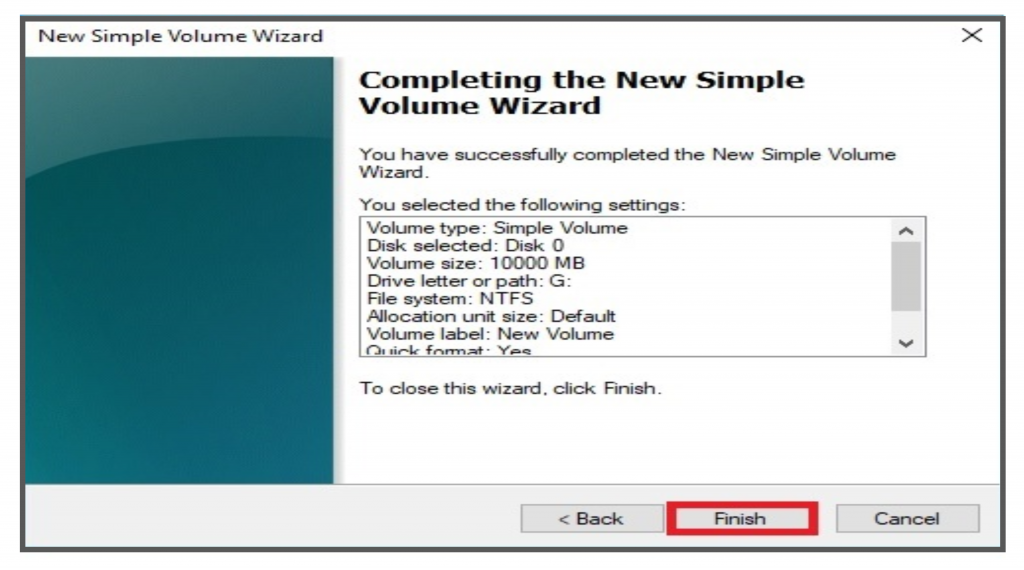
- After completion, click finish, and Disk management Console is closed. The new created drive is now available in the Window for use.
