How to Edit Videos on iPhone: The Ultimate Guide
Editing videos on your iPhone can be a lot of fun and a great way to express your creativity. However, it can also be a bit daunting if you have never done it before. With the popularity of social media and video-sharing websites like YouTube, Tiktok, and Instagram, it’s no wonder that more people are interested in learning how to edit videos on their iPhone. In this guide, we will walk you through the process of editing videos on your iPhone using several different apps. We will also provide tips and a brief guide on how to edit videos on iPhone.
How To Edit Videos On iPhone:
There are three main easily accessible and authentic ways to edit videos on iPhone. Each one has a different purpose with some features that the others might not have. Let’s have a look at three methods for editing your iPhone videos and turning them into cinematic masterpieces.
- Edit With Photos App
- Edit Videos With iMovies
- Edit Videos using Third-Party Apps after downloading from App Store
How to Edit Videos on Your iPhone Photos App:
The Photos app on your iPhone has some basic video editing features that can be used to trim, rotate, or add filters to your videos. To edit a video using the Photos app:
- Open the Photos app and select the video you want to edit.
- Tap the Edit button in the top right corner of the screen.
- Use the tools at the bottom of the screen to trim, rotate, or add filters to your video.
- When you are finished editing, tap Done in the top right corner of the screen.
Now we’ll discuss the functionality of the different features of editing a video in the Photos app on iPhone.
Trim Videos on iPhone Editing App:
You can use the Trim tool to remove unwanted sections from the beginning or end of your video. To trim a video:
- Tap the video icon at the bottom of the screen.
- Use the yellow sliders on either side of the video preview to select the section of the video you want to keep.
- Tap the Play button in the middle of the screen to preview your trimmed video.
- When you are satisfied with the results, tap Done in the top right corner of the screen.
Rotate and Crop Videos on iPhone Editing App:
These tools can be used to rotate a video that was recorded in the wrong orientation and size was not taken in a proper way.
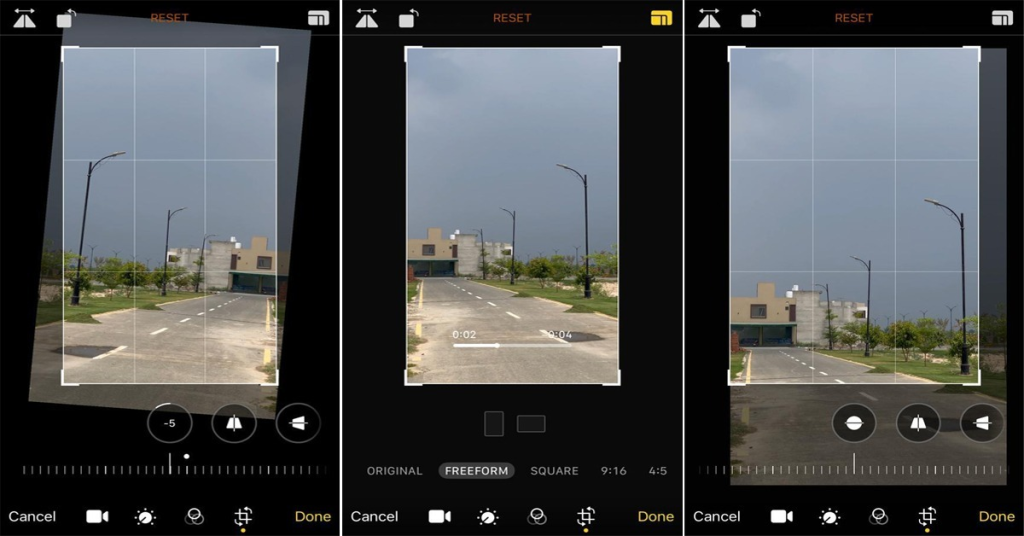
To rotate a video:
- Tap on the crop icon
- Drag the slider right or left to make the video orientation proper
- Use the arrows to rotate the video in the desired direction.
- When you are finished, tap Done in the top right corner of the screen.
To crop a video:
- Tap on the Crop icon.
- Drag the edges of the video preview to crop out any unwanted sections.
- In the top right corner of the screen, tap Done after you’ve finished.
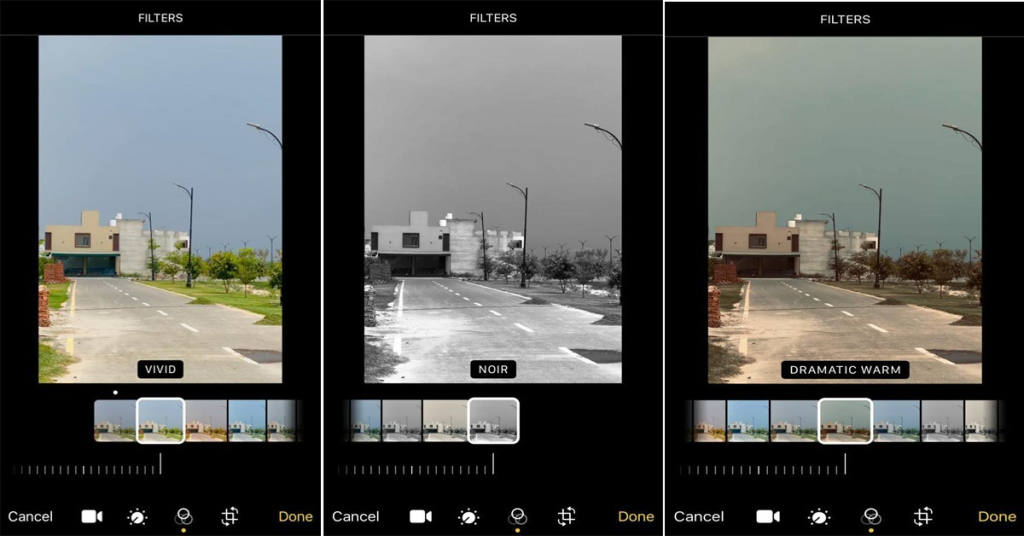
Add Filters to Videos on iPhone Editing App:
Filters allow you to quickly and simply alter the appearance and feel of your video. iPhone offers a variety of filters that can be applied to your videos. To add a filter to a video:
- Tap on the tiny circle icon at the bottom of the screen.
- Scroll through the available filters and tap on one that you want to apply to your video.
There are multiple filters available to choose from that can make realistic, vibrant, authentic, and muted colors video for you.
After adjusting the shape and size of the video, you can further dive into the various different adjustments of colors one-by-one to put over the video. You can proceed to this process by clicking the brightness icon or the second icon given at the bottom of the video. There will be multiple adjustment tools there you can edit video automatically by tapping on the Auto button.
You can also edit your video manually by knowing all the adjustment tools. here are the details of these adjustment tools.
Exposure:
The first tool is exposure. It adjusts the overall brightness of your video. You can increase or decrease the brightness by dragging the slider left or right. If you want to reset the changes, tap on the Reset button. The Exposure tool has a stronger preference for highlights. So the bright tones in your video are more impacted than the dark ones.
Highlights:
The second tool is Highlights. It specifically targets the bright tones in your video. You can increase or decrease the highlights by dragging the slider left or right. If you want to reset the changes, tap on the Reset button.
Shadows:
Shadows specifically target the dark tones in your video. You can increase or decrease the shadows by dragging the slider left or right.
Black Point:
The Black Point tool allows you to adjust the darkest tones in your video. To make the darkest parts of your video appear black, drag the slider to the right.
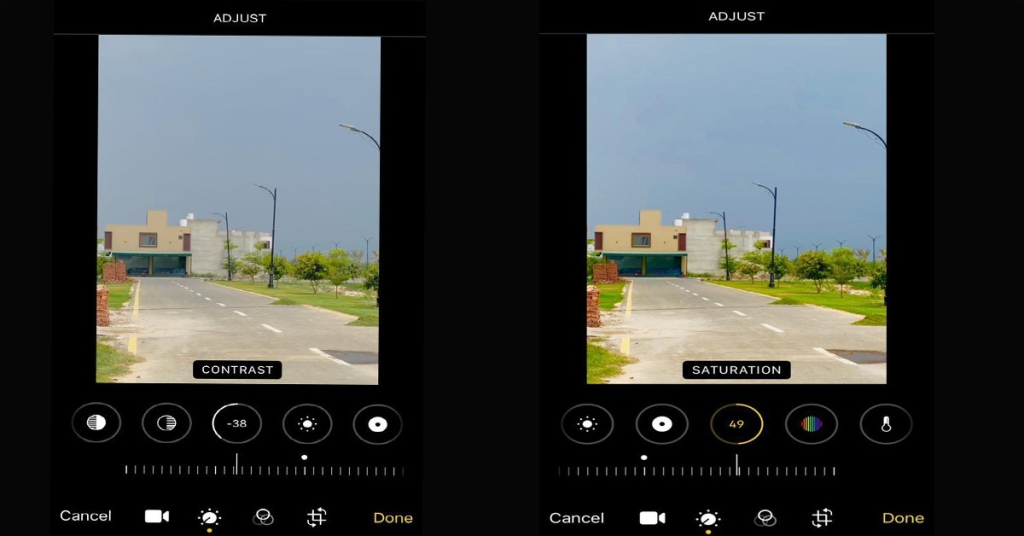
Contrast:
With the Contrast tool, you may adjust the contrast between light and dark tones in your video. A low contrast leaves your video looking flat, while a high contrast can make it look harsh.
Saturation:
The Saturation tool adjusts the intensity of the colors in your video. Low saturation will make your video look more muted, while a high saturation will make the colors appear more vivid. You can increase or decrease the saturation by dragging the slider left or right.
Vibrance:
The Vibrance tool is similar to Saturation, but it has a preference for muted colors. This means that you can increase the vibrancy of your video without oversaturating the bright colors.
Warmth:
The Warmth tool allows you to add or remove a “warm” tint to your video. This is applied across all colors equally. You can increase or decrease the warmth by dragging the slider left or right.
Tint:
The Tint tool allows you to add or remove a green or magenta tint to your video. This is applied across all colors equally.
Fade:
The Fade tool allows you to fade the colors in your video to black and white. You can increase or decrease the fade by dragging the slider left or right.
Sharpness:
The Sharpness tool allows you to adjust the amount of detail in your video. A low sharpness will make your video look blurry, while a high sharpness can make it look “crisp” or “crunchy.”
Brightness:
The Brightness tool allows you to adjust the brightness of your video, but the functionality of this is a bit different from exposure tools.
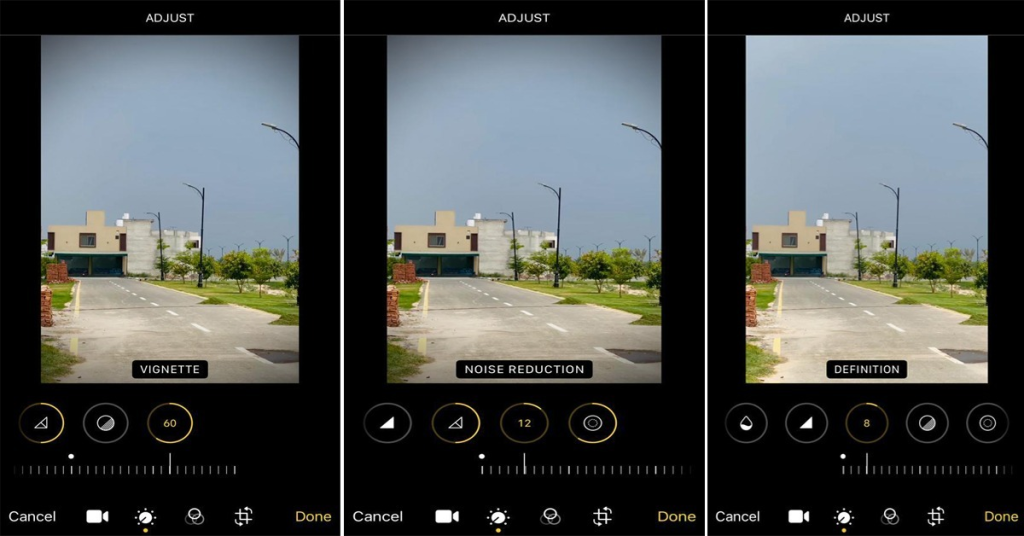
Definition, Noise Reduction, and Vignette tools:
The Definition, Noise Reduction, and Vignette tools are all found in the Effects panel.
- The Definition tool allows you to sharpen or blur your video.
- The Noise Reduction tool allows you to reduce the amount of grain in your video.
- The Vignette tool allows you to add a dark border around the edges of your video.
That’s it! You now know how to edit videos on your iPhone using the built-in editor in the Photos app.
How to Edit Videos on Your iPhone iMovie App:
iMovie is a free app that can be downloaded from the App Store. It has more advanced video editing features than the Photos app, including the ability to add titles, transitions, and background music. To edit a video using iMovie:
- Open the iMovie app and tap the Projects tab at the bottom of the screen.
- Tap the + button in the top left corner of the screen.
- Select Movie from the list of options.
- Tap the video you want to edit and then tap Create Movie.
- Use the tools at the bottom of the screen to add titles, transitions, or background music.
- When you are finished editing, tap Done in the top right corner of the screen.
How to Edit Videos on Your iPhone Using an External App:
There are a number of external apps that can be used to edit videos on your iPhone. Some of these apps are free, while others must be purchased. Here are some of the best editing apps for iPhone and iPad:
- FilmoraGo
- KineMaster
- Inshot
- Splice
- CapCut
- Quik
Conclusion:
Now that you know how to edit videos on your iPhone, it’s time to get creative and start making some amazing videos. If you need some inspiration, check out our list of the best video editing apps for iPhone and iPad. Hope So this detailed note will help you a lot in learning how to edit videos on iPhone.