How to Delete an Album On iPhone

To clutter up the photo albums from the photo app of your iPhone is not difficult. Maybe you want to get rid of the stuff that you created years ago in past and then dismissed from your mind. And suddenly you realized after seeing something created by the app for you. There is no doubt that iPhone is the most popular mobile camera across the globe. Even if it is surpassing DSLR. And Photo app is one of the main reasons for this. We agree that Apple company is improving the new versions of the iPhone and other devices in terms of features, quality, and storage.
The photo app is a platform where you can save, organize and browse your memories. It saves your memories in the form of albums containing clusters of photos/videos of each event. Such as Marriage 2022, Hurrah moments, etc. Well, when it comes to the question about how to delete an Album on iPhone, the answer is easy.
Read Also:
How to Change Language on iPhone
Ways To Secure Your iPhone from Being Hacked
Best iPhone Accessories and Gifts for Apple Lovers
The reason is that almost all iOS have the same method of deleting photos. So, here I will explain the general method to you. Before this, let me answer a frequently asked question:
Why after deleting an album, the photos are still on my device?
When you make a new photo album, and insert the selected photos in it, it does not mean that you have placed, moved, or copied photos there. In reality, you have to make a graphic shortcut I.e a photo representation via album. So, when you delete the album, only the representation (in other words the organizational structure) diminishes while the original material is still in the main library/storage of your phone. This is the answer to your question that even after deleting the album, the material is still there.
Besides, keep in mind that you cannot delete the default albums such as:
- Panoramas
- Recent
- Slo-mo
- Screenshots
- Videos
- Recently deleted, etc
How to Delete an Album on iPhone Temporarily?
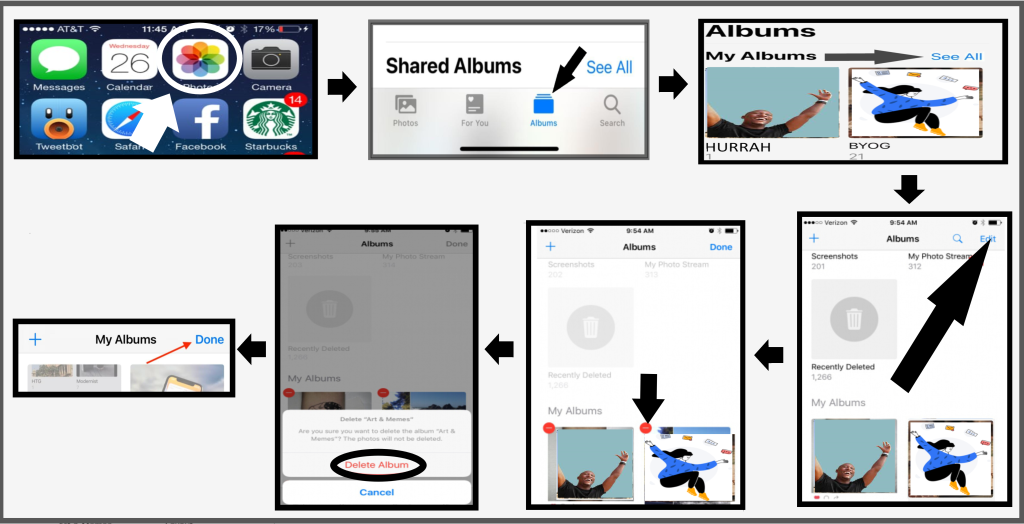
The reason I write temporarily here is that you still can recover or backup the albums if you want. Here is a step-by-step guide on how to delete an album on iPhone.
1. Go to the Photos app. Tap on it. It will open.
2. At the bottom right corner of the screen, you will see the “Albums” button. Tap on it.
3. Now, click on the “See All” option so that you can get the option “My Albums” there.
4. Under the “My Albums” option, you will be provided with all the albums that you have made for your convenience.
5. There, in the top right corner, you will see the “Edit” option. Tap on it and you will see a dot-like circle on the top left corner of every album (that can be deleted) and in its center, there will be a minus sign.
6. Tap on this red circle containing a minus sign for all those albums that you want to delete. (Scroll down if needed to select more albums from downward there)
7. A pop-up will appear on tapping that red circle asking: ” Delete Album” written in red. In this pop-up, it will further ask you in grey “Are you sure you want to delete Album Album name here”? the photos will not be deleted.
8. If deleting the Album is your final decision, then click on “Delete Album” written in red.

9. Congratulations, the Album is successfully deleted.
How to Delete an Album on iPhone Permanently?
Deleting the albums is not a hard nut to crack. You can do it easily after reading the above-written process. But there is still a backup or recovery option from where you can get that Album back. If you want to clutter up your fone by deleting Albums without keeping any backup option, a professional data eraser software is needed. Here is a complete guide as a solution to your problem of How to delete an album on an iPhone permanently. Follow these steps:
1. Download and install data Eraser Software on your PC. For instance, the Safewiper iPhone data eraser is a good choice so I am going to guide you according to this one.
2. Now Launch it.
3. Once it’s done, connect your iPhone to your PC with the USB cable. The program will recognize your device automatically.
4. Now, select the option: Erase Deleted Files from the left bar. The software will scan the deleted albums on your iPhone.
5. The process of scanning may become a bit time-consuming for you due to deep scanning.
6. Once the scanning is done, all the deleted, as well as existing material, will be displayed. The material includes cookies, messages, call history, WhatsApp messages, etc. You can preview the scanned data if you want.
7. Now, select the file type you want to delete and click the “Erase Now” button in green on the bottom right corner.

8. After the deletion process is complete, you cannot recover your albums or other erased material anymore.
How to Delete an Album on iPhone that is Synced from iTunes
The process of deletion of Albums that are synced on iTunes is different. It needs more energy than yours. Because for this purpose, you need two more gadgets. One is your Personal computer. And other is a data cable (to attach your iPhone to the PC). The further process will be done on PC. So, the steps for how to delete an album on iPhone I.e synced from iTunes are as follows:
1. Attach your iPhone to your PC through a data cable. Once it’s detected, open iTunes.
2. Now select the iPhone logo close to the top left corner of iTunes.
3. Now click on Photos.
4. Now, select the circle next to Selected Albums.
5. Now choose the albums that you want to keep on your iPhone.
6. Select carefully because the deselected albums will be erased from your cell.
7. After the selection is done, click the button “Apply” present in the lower right corner of the screen. It will sync your iPhone to iTunes.
8. After the sync process is completed, go to the lower right corner of the screen, and click on “Done”.
9. Well, once again you have successfully cleared up some of your space.


